
Dryer Taking Too Long to Dry? The Vent Is the First Place to Look
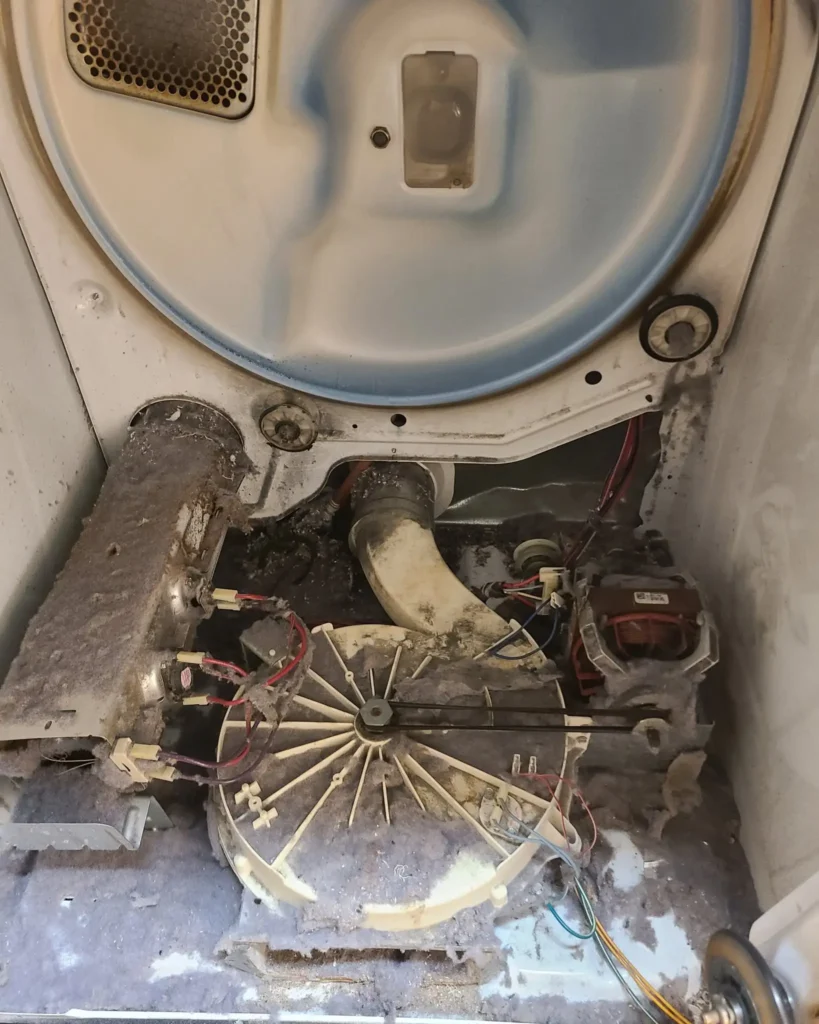
A dryer taking too long to dry a normal load is rarely about a broken heating element. In most cases the dryer is producing heat, but hot, moist air cannot leave the drum fast enough because the exhaust vent is restricted. Lint buildup, a crushed transition duct, a long vent run with too many elbows, a blocked exterior vent or a bird nest in the termination point can all reduce airflow enough to double or triple dry times.
This is not just a performance problem. A restricted dryer vent is a fire safety hazard. The U.S. Fire Administration identifies failure to clean dryer vents as the leading contributing factor in an estimated 2,900 home dryer fires per year. The CPSC recommends cleaning the lint screen before or after every load and having the full vent duct inspected and cleaned regularly.
Before scheduling a service call for a dryer taking too long, check the lint screen, the transition duct, the exterior vent and the load. These checks take minutes and often explain the problem completely.
For help arranging dryer diagnosis in Staten Island, tell us the brand, model number, gas or electric, how long a standard load takes and whether you have checked the vent. Appointment availability, the business handling the visit, diagnostic terms and repair scope should be confirmed before the appointment.
Request Dryer Service
How Long Should a Dryer Actually Take?
A properly functioning dryer with a clear vent should dry a normal load of cotton towels or mixed laundry in approximately 40 to 60 minutes on a regular heat cycle. The exact time depends on the load size, fabric type, spin extraction from the washer, humidity, dryer capacity, heat setting and vent length.
When a dryer that used to finish in under an hour now takes 90 minutes, two hours or multiple cycles, something has changed. The most common changes, in order of likelihood:
- Vent restriction has developed gradually. Lint accumulates in the duct over months and years, especially in long or routed vent paths.
- The lint screen is coated. Dryer sheets and fabric softener leave an invisible film that restricts airflow even when the screen looks clear.
- The transition duct is crushed or kinked. The flexible duct between the dryer and the wall vent is often compressed when the dryer is pushed back.
- The exterior vent is blocked. Lint, bird nests, insect nests, paint, debris or a stuck flap can block the termination point.
- The load is too large, too wet or too heavy. An overloaded dryer or a washer that did not spin properly sends excess moisture into the dryer.
- An internal component has degraded. A failing heating element, worn gas valve solenoid, faulty thermostat, contaminated moisture sensor or broken blower fan reduces drying efficiency.
The Vent Check: Step by Step
This is the single most important check for a dryer taking too long. Do it before assuming an internal component has failed.
Step 1: Clean the lint screen thoroughly
Remove the lint screen and clear all visible lint. Then hold the screen up to the light. If light does not pass through freely, the mesh is coated with residue from dryer sheets or fabric softener. Wash the screen with warm water and a soft brush, rinse it and let it dry completely before reinstalling.
A coated lint screen restricts airflow as effectively as a partially clogged vent. Cleaning it may noticeably reduce dry time on its own.
Step 2: Check the lint-screen housing
Look down into the housing where the lint screen sits. Use a flashlight. Lint that bypasses the screen can accumulate in this cavity and restrict airflow to the blower. A narrow vacuum attachment can remove visible lint from the housing.
Step 3: Inspect the transition duct
Pull the dryer away from the wall just enough to see the duct that connects the dryer to the wall vent. Turn off the gas (gas dryers) or unplug the dryer (electric) before pulling it forward. Check for:
- Crushed or kinked sections. A duct compressed against the wall cannot pass air.
- Sagging. A long, unsupported flexible duct sags and collects lint in the low points.
- Duct type. Foil flex duct and vinyl flex duct are not recommended. Rigid or semi-rigid metal duct is preferred by manufacturers and fire-safety standards.
- Connections. Make sure the duct is securely attached at both ends. Duct tape is not the correct fastener; foil tape or metal clamps are appropriate.
If the transition duct is crushed, replace it rather than trying to reshape it. Creased metal and crimped foil do not recover their original airflow capacity.
Step 4: Check the exterior vent
Go outside and locate where the dryer vent exits the building. While the dryer is running on a timed-heat cycle:
- Feel the air. Strong, warm, humid airflow is normal. Weak or barely detectable airflow indicates a restriction somewhere in the duct.
- Check the flap. The vent flap or louver should open fully when the dryer runs. If it barely moves, lint or debris may be holding it closed.
- Look for blockage. Bird nests, insect nests, accumulated lint, paint, stucco, screening or debris can block the vent opening. Some terminations have small-gauge screening that catches lint and eventually seals shut.
If you cannot locate the exterior vent, the duct may terminate in a wall cavity, attic, crawl space or soffit area. Dryers should never be vented into an enclosed space. This is both a fire hazard and a moisture/mold concern.
Step 5: Assess the full vent length and routing
The manufacturer specifies a maximum equivalent vent length, typically 25 to 35 feet, with reductions for each elbow. A 90-degree elbow typically reduces the effective length by 5 feet. A vent run that exceeds the maximum produces back pressure that slows drying and accelerates lint buildup.
Count the elbows if you can see the duct path. If the vent runs through interior walls, up through a second floor, into an attic or through a long horizontal run, you may not be able to assess the full length without professional help. A dryer vent cleaning service can inspect the full duct from the dryer to the exterior termination.
Is a Dryer Taking Too Long a Fire Hazard?
Yes. A restricted vent is both a performance problem and a safety problem. Understanding the connection is important.
How dryer fires start
Lint is combustible. When the exhaust vent is restricted, the dryer’s internal temperature rises because hot air cannot escape. The heating element or gas burner continues to produce heat. Lint that has accumulated inside the dryer cabinet, in the vent duct or near the heating source can ignite under these conditions.
The U.S. Fire Administration reports that:
- Dryers and washing machines cause an estimated 15,970 fires per year, with dryers responsible for 92 percent.
- Failure to clean is the leading factor, accounting for roughly one-third of dryer fires.
- Most dryer fires occur in one- and two-family dwellings.
- January is the peak month, consistent with heavier dryer use in cold weather.
The CPSC recommends:
- Clean the lint screen before or after every load.
- Have the vent duct inspected and cleaned at least once a year.
- Replace vinyl, foil or other nonrigid duct with rigid or semi-rigid metal.
- Make sure the vent terminates outdoors with a proper flap.
- Do not overload the dryer.
- Do not leave the dryer running when you leave home or go to sleep.
Signs that a vent restriction may be creating a safety issue
- The dryer exterior feels unusually hot to the touch.
- The laundry room feels hot and humid when the dryer runs.
- Clothes are very hot but still damp at the end of the cycle.
- There is a burning or musty smell.
- The exterior vent produces little or no airflow.
- The dryer shuts off before the cycle ends (the thermal fuse may be tripping).
- Lint is visible around the dryer exterior, on the floor behind it or at the wall connection.
If you observe any of these signs, stop using the dryer until the vent has been inspected and cleaned. Do not override a thermal safety device or keep running the dryer with a known vent restriction.
What If the Vent Is Clean but the Dryer Still Takes Too Long?
If the lint screen is clear, the transition duct is in good condition, the exterior vent has strong airflow and the duct length is within the manufacturer’s limits, the following issues may explain extended dry times.
The washer is not spinning properly
If the washer’s final spin speed is too low, clothes enter the dryer holding excess water. A dryer removes water by evaporation, which is slower than mechanical extraction. Check whether clothes feel excessively heavy and waterlogged when transferred. If so, the washer spin cycle, load balance, drain pump or spin speed setting may need attention.
See: Spin problems → /resources/washer-not-spinning/
The load is too large or too dense
An overloaded dryer drum does not allow air to circulate through the fabrics. Heavy items like comforters, bath mats, blankets and thick towels require more time and more space. Dry heavy items in smaller batches rather than one large load.
The heat source has partially failed
An electric heating element can break at one point while the remaining coil still produces some heat. Gas valve solenoids can weaken, producing intermittent ignition. A cycling thermostat that opens too early reduces the average operating temperature. Each of these conditions produces heat but not enough to dry within a normal time.
The moisture sensor is contaminated
Many dryers use metal moisture-sensing bars inside the drum to detect when clothes are dry. Dryer sheets and fabric softener leave a residue on these bars that insulates them, causing the sensor to misread and either end the cycle prematurely or not regulate heat efficiently. Clean the bars with rubbing alcohol and a soft cloth. Check the owner manual for the sensor location.
The blower fan is damaged or obstructed
The blower fan moves air through the drum and out the vent. A broken fan blade, loose fan, or lint buildup inside the blower housing reduces airflow even if the external vent is clear. Blower diagnosis requires opening the dryer cabinet.
The felt seal or drum seal is worn
Seals around the drum openings prevent air from escaping inside the cabinet instead of flowing through the exhaust vent. Worn seals reduce the effective airflow through the drum and can produce a thumping or scraping noise as well.
Staten Island Conditions That Affect Drying Time
Long and routed vent paths
Many Staten Island homes, townhouses and attached dwellings route the dryer vent through interior walls, up through second-floor chases, into attic spaces or through roofline penetrations. The longer the run and the more elbows in the path, the more lint accumulates and the harder the dryer works. A vent that technically meets the manufacturer’s maximum length on installation day may underperform if the duct has never been cleaned.
If the dryer has always been slow in this location, the vent path itself may exceed the rated capacity. A dryer vent specialist can measure the actual airflow and recommend duct modifications.
Roof and soffit terminations
Vertical vent runs to the roof or soffit are common in multi-story Staten Island homes. These runs are harder to inspect and clean than a horizontal run through a side wall. Lint can accumulate at elbows, collect in vertical sections and block the roof cap. Rain, snow and ice can also enter a damaged or improperly installed roof vent.
Humidity and seasonal variation
Staten Island summers are humid. A dryer in a warm, humid laundry room has to work harder because the incoming air already carries moisture. If the laundry room has no ventilation or the dryer is in a closed closet, humidity builds up and drying time increases. Opening a window or using an exhaust fan in the laundry area can help, but it does not replace vent maintenance.
In winter, heavier dryer use means more lint production and faster vent restriction. Cold exterior air meeting warm exhaust can also produce condensation inside the vent duct, which captures lint and accelerates buildup.
Stacked and closet installations
Dryers in tight laundry closets or stacked on a washer need adequate airflow around the cabinet. If the closet door is solid and remains closed during operation, the dryer may overheat, trigger thermal safety devices and extend cycle times. Check the manufacturer’s clearance and ventilation requirements for closet installation.
Landlord, tenant and building considerations
If the landlord installed the dryer, notify the landlord or property manager in writing about extended dry times. New York guidance says landlord-installed appliances in multiple dwellings must be maintained in good and safe working order. Vent cleaning and vent-path modifications may require building coordination, especially in shared structures.
What to Record Before Requesting Service
- Full brand and model number from the appliance label.
- Gas or electric.
- How long a normal load currently takes versus how long it used to take.
- When the lint screen was last cleaned and its current condition.
- When the vent duct was last professionally cleaned.
- Exterior vent airflow: strong, weak or none.
- Transition duct condition: rigid, semi-rigid, foil flex or vinyl.
- Approximate vent run length and number of elbows if visible.
- Whether clothes come out hot but damp, cool and damp, or partially dried.
- Whether the dryer shuts off mid-cycle or runs the full time.
- Whether the laundry room feels hot or humid during operation.
- Any error code, photographed before clearing.
- Warranty, service-contract or recall status.
- Access limits, ownership and building requirements.
Search the exact model at the CPSC recall database and the manufacturer’s support site.
When Should You Stop Checking and Request Diagnosis?
A dryer taking too long after cleaning the lint screen, inspecting the transition duct and confirming exterior airflow may need professional diagnosis for either the vent system or the dryer itself. Request service when:
- The vent appears clear but dry time is still double the normal expectation.
- You cannot access the full vent path for inspection.
- The dryer shuts off mid-cycle, suggesting a thermal safety device is tripping.
- The dryer exterior feels unusually hot or the laundry room overheats.
- You detect a burning smell, visible lint accumulation or discolored vent connections.
- The dryer produces low heat, no heat or intermittent heat.
When arranging service, ask:
- Who will handle the appointment and diagnosis?
- What does the diagnostic or service-call fee cover?
- Does the diagnosis include a vent-airflow evaluation?
- Does the technician also perform vent cleaning, or is that a separate service?
- Is the written option itemized for parts, labor, tax and other charges?
- What repair and warranty terms will be provided in writing?
Request Drying-Time Diagnosis
Repair, Clean or Replace?
Extended drying time is often a vent problem, not a dryer problem. A professional vent cleaning may restore normal performance entirely. If the dryer itself has a component failure—a partial element, worn solenoid, failed thermostat, damaged blower—compare the repair cost with the appliance’s age and replacement cost.
Consider the quoted repair, vent cleaning cost, appliance age, gas versus electric, vent condition and whether the vent path itself needs modification to meet the manufacturer’s specifications.
Compare repair vs replacement → /resources/repair-or-replace-appliance/ Understand quote components → /resources/appliance-repair-cost-staten-island/
Get Help With a Dryer Taking Too Long in Staten Island
If you have cleaned the lint screen, inspected the transition duct and checked the exterior vent, and the dryer still takes too long, request a model-aware diagnosis. Specify gas or electric, describe the drying time, the vent path and whether the dryer produces heat. Confirm appointment availability, diagnostic terms, provider scope and written authorization before work begins.
Phone hours: 8:00 a.m. to 5:00 p.m. daily.
Dryer service overview → /services/dryer-repair/ Dryer not heating? → /resources/dryer-not-heating/ How the visit works → /how-it-works/ Service-area review → /service-areas/